Overview
MyraMath can be built natively on Windows using the Microsoft Visual C++ compiler. The following instructions use Visual Studio 2015 because it supports C++11 features, but other versions of Visual Studio are mostly similar. The first step is to generate a .sln (solution) file by running CMake. A BLAS/LAPACK implementation is required to build MyraMath, if you don't have one you should download and build MyraKL first. Closed source products like Intel MKL are also suitable (MyraMath can link to them without source). Building the library (myramath.dll) and the accompanying test suite (myramath_tests.exe) is straightforward. Once you've run a few tests to verify that MyraMath is behaving correctly, you're ready to integrate the library into new projects of your own.
Below are links to the sections of this page:
- Running CMake
- Opening MyraMath in Visual Studio
- Building the library
- Environment Settings
- Running tests
- Creating new projects of your own
Running CMake
A native Windows installer for CMake can be found at CMake.org. If you already have CMake installed, just make sure it's version 2.8.9 or newer. Create a set of three of folders inside "My Documents" for MyraMath:
-
One to hold the source code, like
"My Documents\MyraMath\source" -
Another to hold the intermediate build products, like
"My Documents\MyraMath\build" -
And one to hold the final install, like
"My Documents\MyraMath\install"
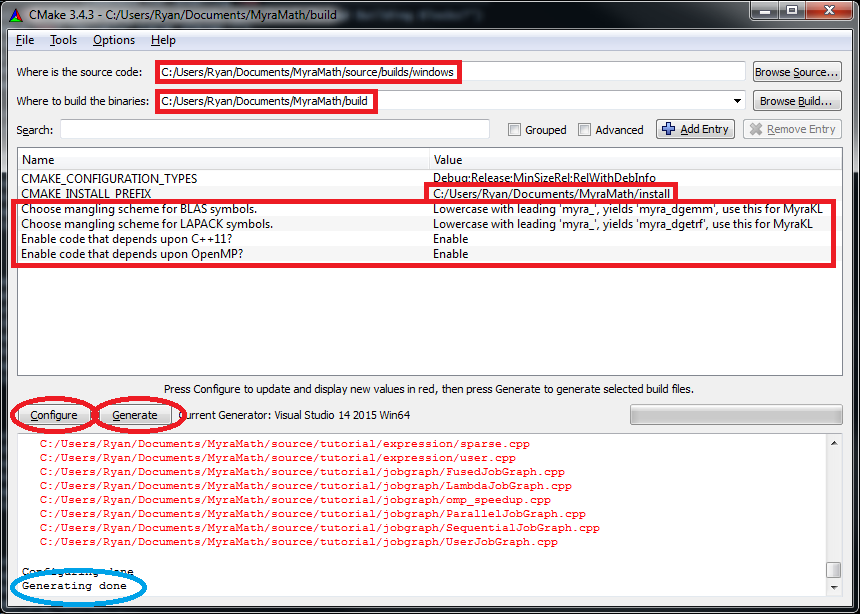
Unzip myramath.zip into the source folder, then launch CMake GUI (see screenshot below). Inside the field labeled "Where is the source code:", type in the path to MyraMath's CMakeLists.txt, which is within builds\windows of your source tree. In the field labeled "Where to build the binaries:", type in your build folder. Next to the CMAKE_INSTALL_PREFIX variable, type in your install folder. You can also use the browse buttons on the right to populate these.
Click here to view fullsize image.
Once CMake has finished inspecting your system, there are a few reconfigurable options that you may want to specify:
- Whether or not your compiler supports C++11. [defaults to Yes]
- Select mangling scheme for BLAS symbols.
- Select mangling scheme for LAPACK symbols.
- Whether or not your compiler supports OpenMP. [defaults to Yes]
If using MyraKL, all these defaults are fine. There are a few situations where non-defaults should be used. First, if you're using Intel's MKL for your BLAS/LAPACK layer, you will need to change the BLAS/LAPACK mangling schemes. Second, some older versions of Visual Studio do not have complete support for C++11 so you may need to disable it if you're using anything before Visual Studio 2015. After making these selections, click Generate. Upon completion/success, you should see "Generating done" in the logger.
Opening MyraMath in Visual Studio
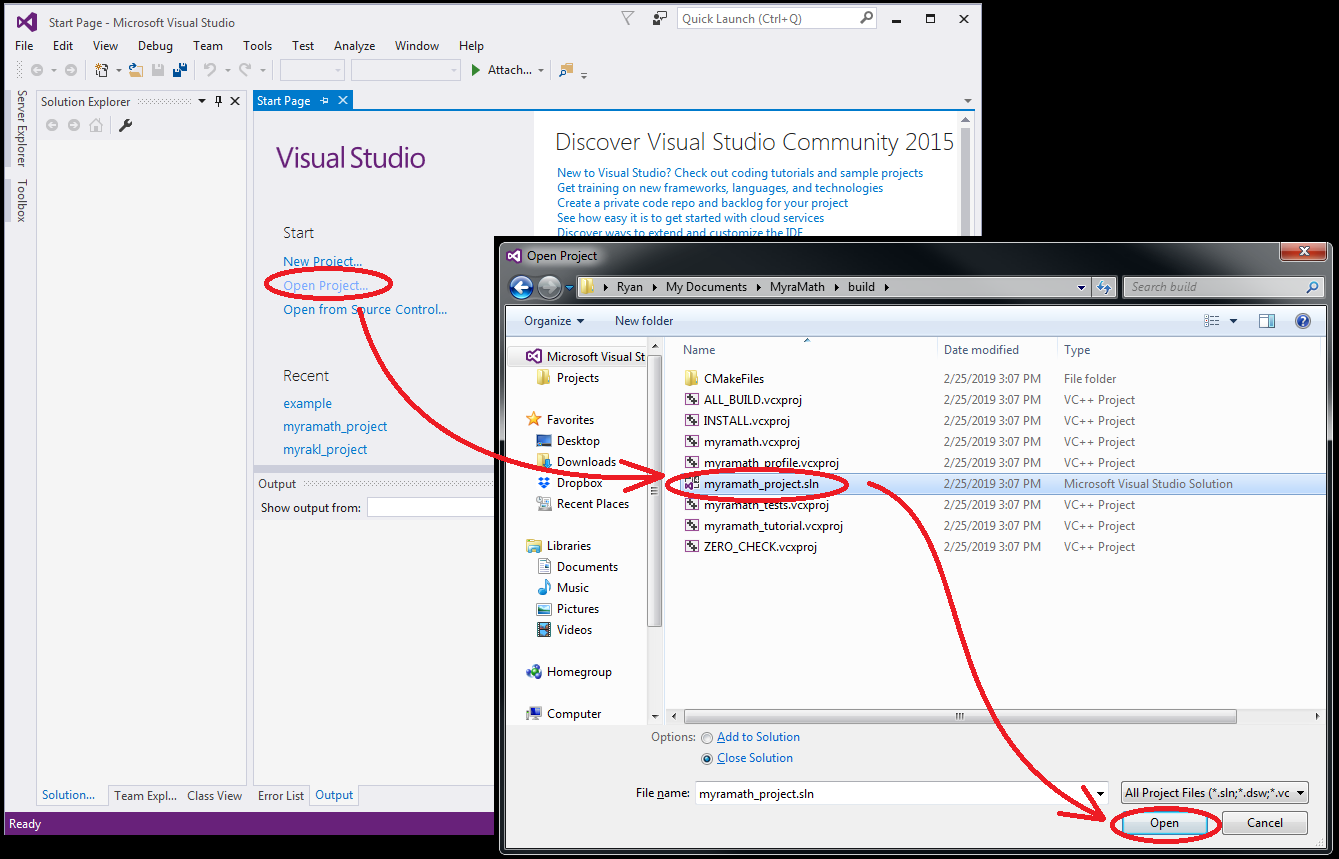
Launch Visual Studio. Click "Open Project", then browse to your build folder and the solution file that CMake just created (named myramath_project.sln). The project contains multiple targets, so it may take a few moments for Visual Studio to digest them all.
Click here to view fullsize image.
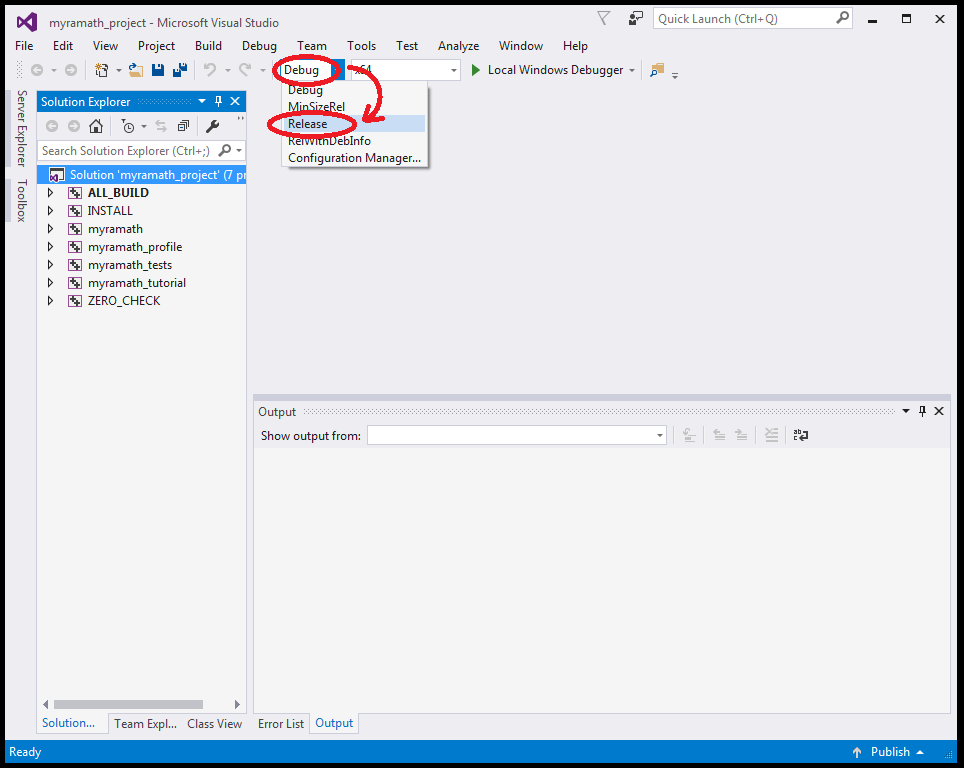
Before trying to build anything, change all the tagets from Debug to Release using the combobox at the top. It will take a few moments to apply this change to every target.
Click here to view fullsize image.
Linking in BLAS and LAPACK
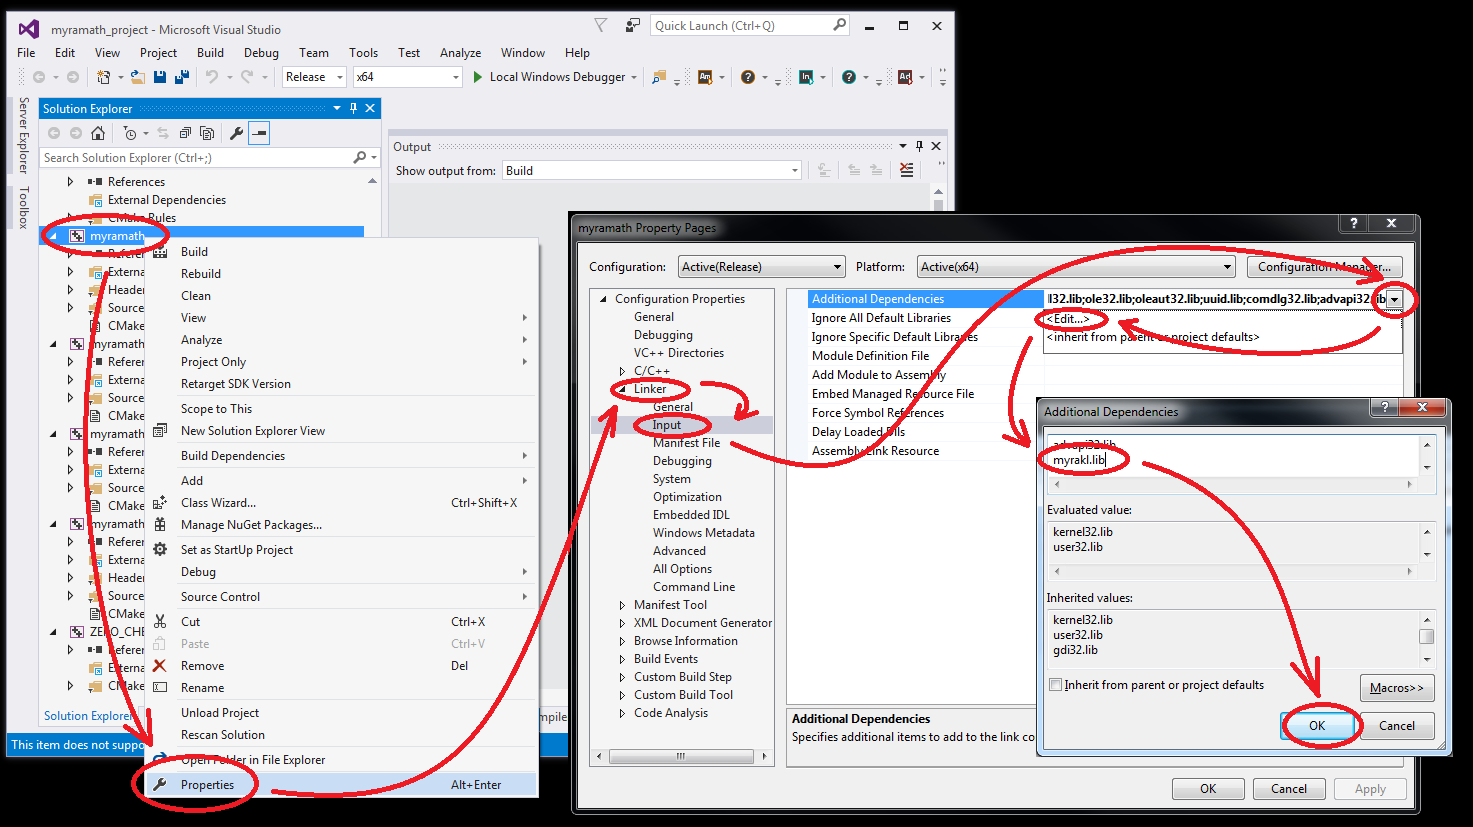
For portable performance, MyraMath depends heavily on a BLAS and LAPACK installation. Several implementations are available for Windows. The highest performing closed-source solution is probably Intel MKL. You can also use MyraKL for an open-source solution that is easy to build. These instructions will only address MyraKL in detail, so now is a good time to download and build it. Once you've built MyraKL successfully, you should have myrakl.dll and myrakl.lib present in MyraKL's install folder. Two adjustments to the myramath target are required:
First, add an "Additional Dependency" for myrakl.lib, you can just type it in at the end of the existing list:
Click here to view fullsize image.
Second, add an "Additional Library Directory" for the folder that contains myrakl.lib, typically "My Documents\MyraKL\install":
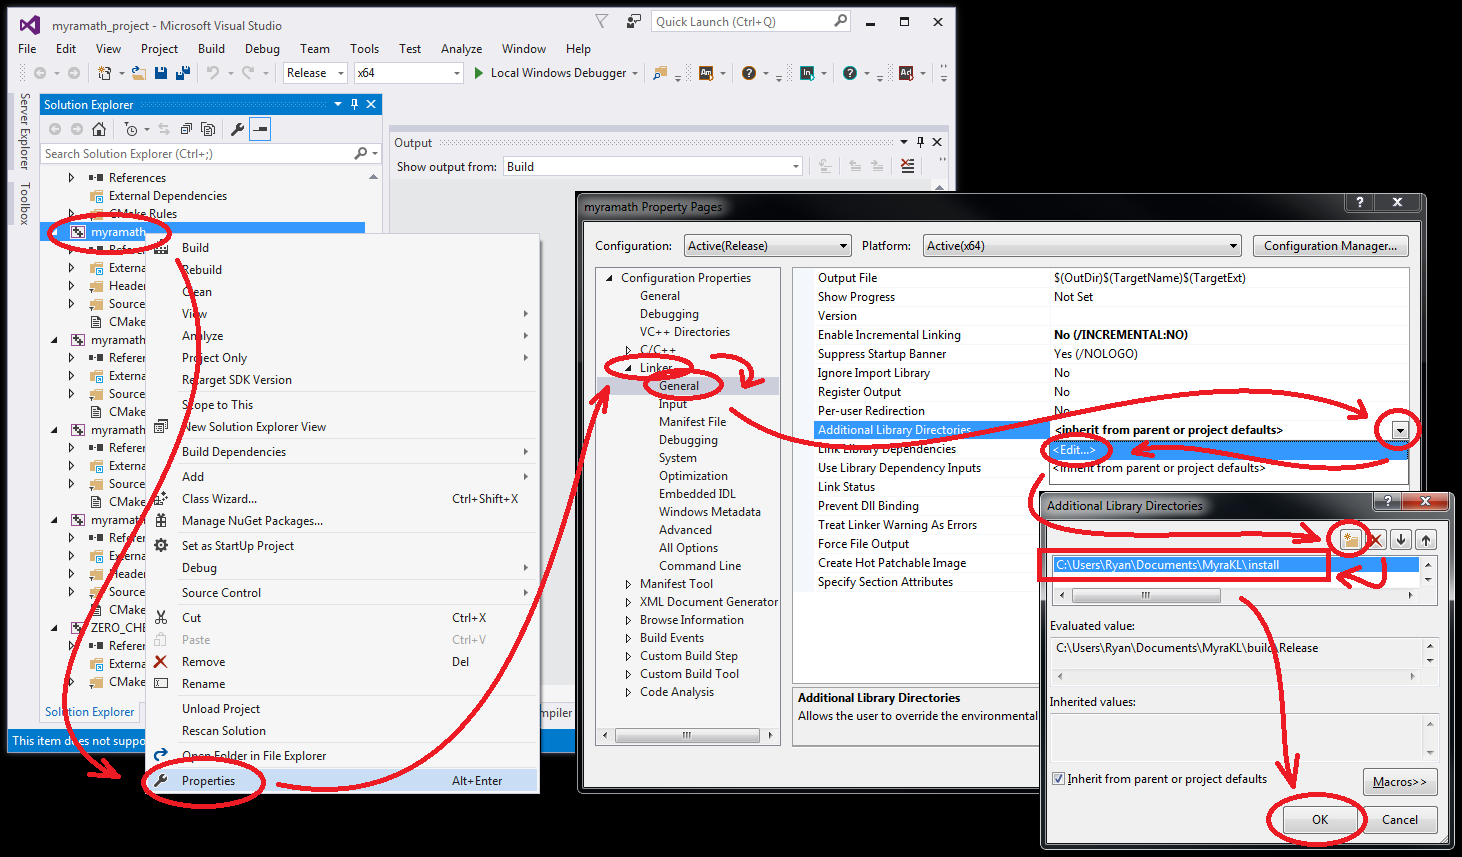
Click here to view fullsize image.
If you're using Intel MKL these steps are similar: link in the MKL runtime, mkl_rt.lib, which is typically located in C:\Program Files (x86)\IntelSWTools\compilers_and_libraries\windows\redist\intel64_win\mkl.
Building the library
There are several targets worth mentioning:
-
myramath, which producesmyramath.libandmyramath.dll -
myramath_tests.exe, which gathers all the unit tests into a command-line executable -
myramath_profile.exe, which contains performance/profiling tests -
myramath_tutorial.exe, which contains example/tutorial programs -
INSTALL, a phony target that copies these other products into the install folder
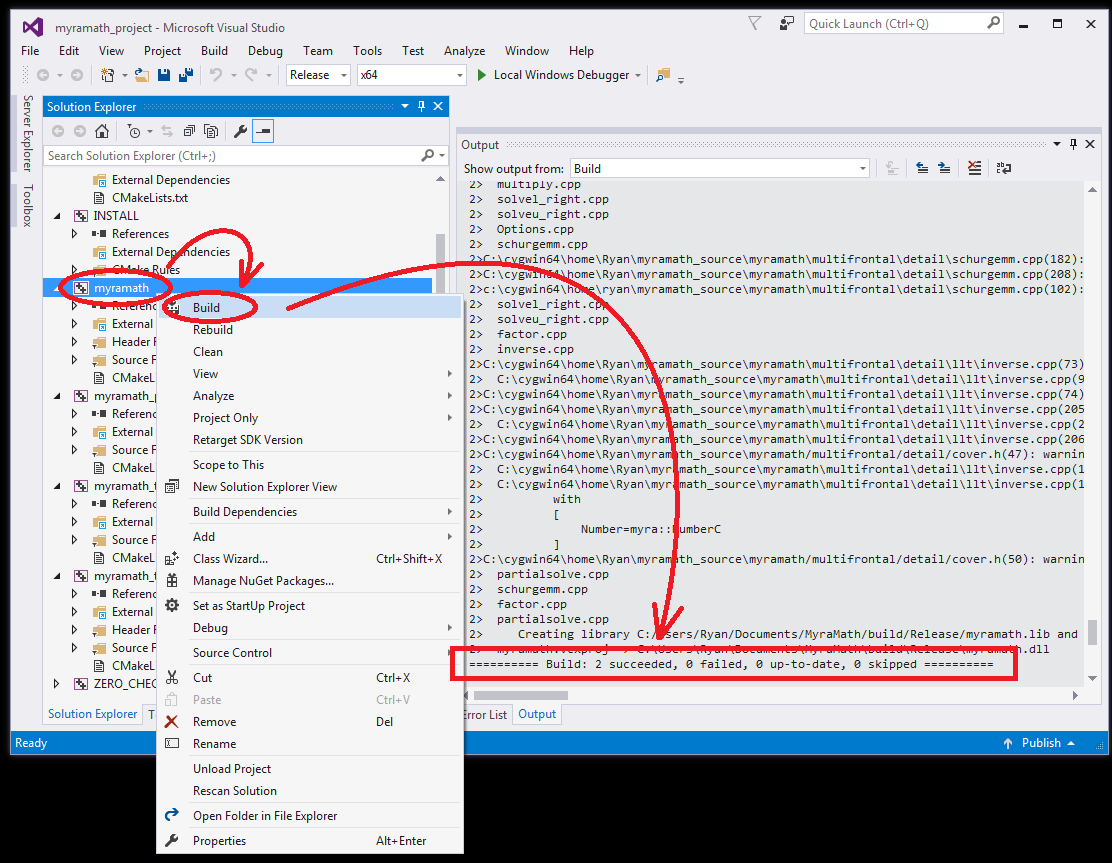
Start by building the myramath target, but be prepared to for a bit of a wait and plenty of warnings (MyraMath support on Windows is still a work in progress). The most likely point of failure is incorrectly linking the BLAS or LAPACK layers. If the linker complains of missing symbols, carefully read and repeat the previous two steps (choosing a mangling scheme within CMake GUI, and adding the dependency within Visual Studio). If successful, you should see "========== Build: 2 succeeded, 0 failed, 0 skipped ==========" at the end of the logger (see below).
Click here to view fullsize image.
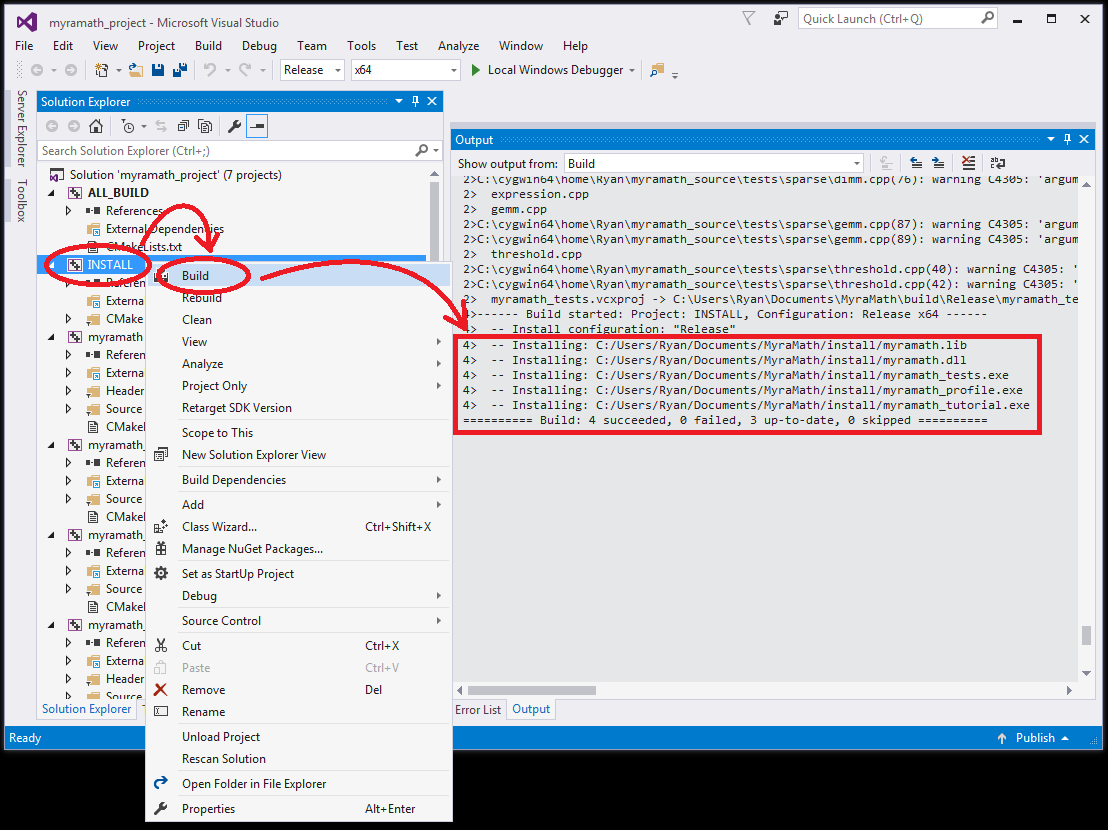
You can build the remaining targets (myramath_tests, myramath_profile and myramath_tutorial) one at a time, or just build the INSTALL target, which will build each of them in turn and copy them to whatever install folder you've specified. If successful, you should see "========== Build: 4 succeeded, 0 failed, 3 up-to-date, 0 skipped ==========" at the end of the logger.
Click here to view fullsize image.
Environment Settings
MyraMath is internally multithreaded so you should use a singlethreaded BLAS/LAPACK layer to avoid oversubscription. There are several environment variables that should be set to get this behavior. You can invoke these commands from the terminal, or add them once and for all using Control Panel:
-
set MYRAMATH_NUM_THREADS=number of physical [not hyperthreaded] cores
(if using Intel MKL)
-
set MKL_NUM_THREADS=1
Running tests
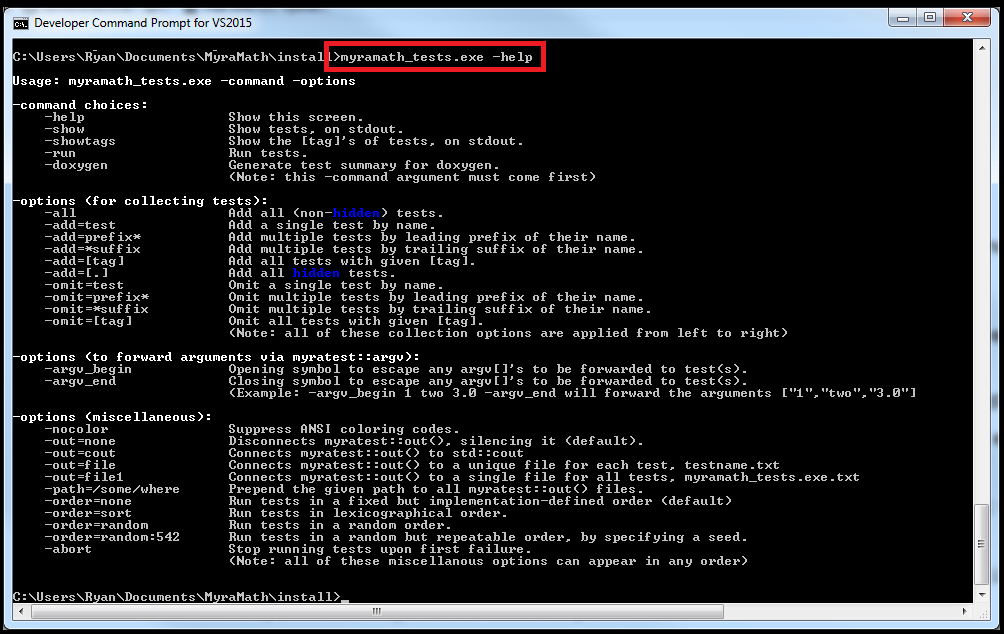
All of the executables are intended to be run from the terminal, but require myramath.dll and myrakl.dll to be in your %PATH%. The unit tests (and tutorial programs, etc) are all based on the MyraTest framework/test-runner. Try running myramath_tests.exe -help to get started, or browse the MyraTest tutorial for more information.
Click here to view fullsize image.
You probably don't need to run all of the tests, but a few interesting selections are given below:
-
myramath_tests.exe -run -add=[dense]: tests with the [dense] tag verify correctness of the BLAS/LAPACK install. -
myramath_tests.exe -run -add=maxthreads: verifies thatMYRAMATH_NUM_THREADSreports multiple threads. -
myramath_tests.exe -run -add=pgemm_speedup: evaluates thread-parallel efficiency for pgemm(), matrix multiplication. -
myramath_tests.exe -run -add=rcholesky2*: verifies sparse solver functionality on small 2D problems. -
myramath_profile.exe -run -add=rcholesky3_factor: evaluates sparse solver thread-parallel efficiency on user-sized 3D problems
Creating new projects of your own
This tutorial concludes by writing a small example program that uses MyraMath. Launch Visual Studio again, then create a new Windows Console Application entitled "example" (see screenshot):
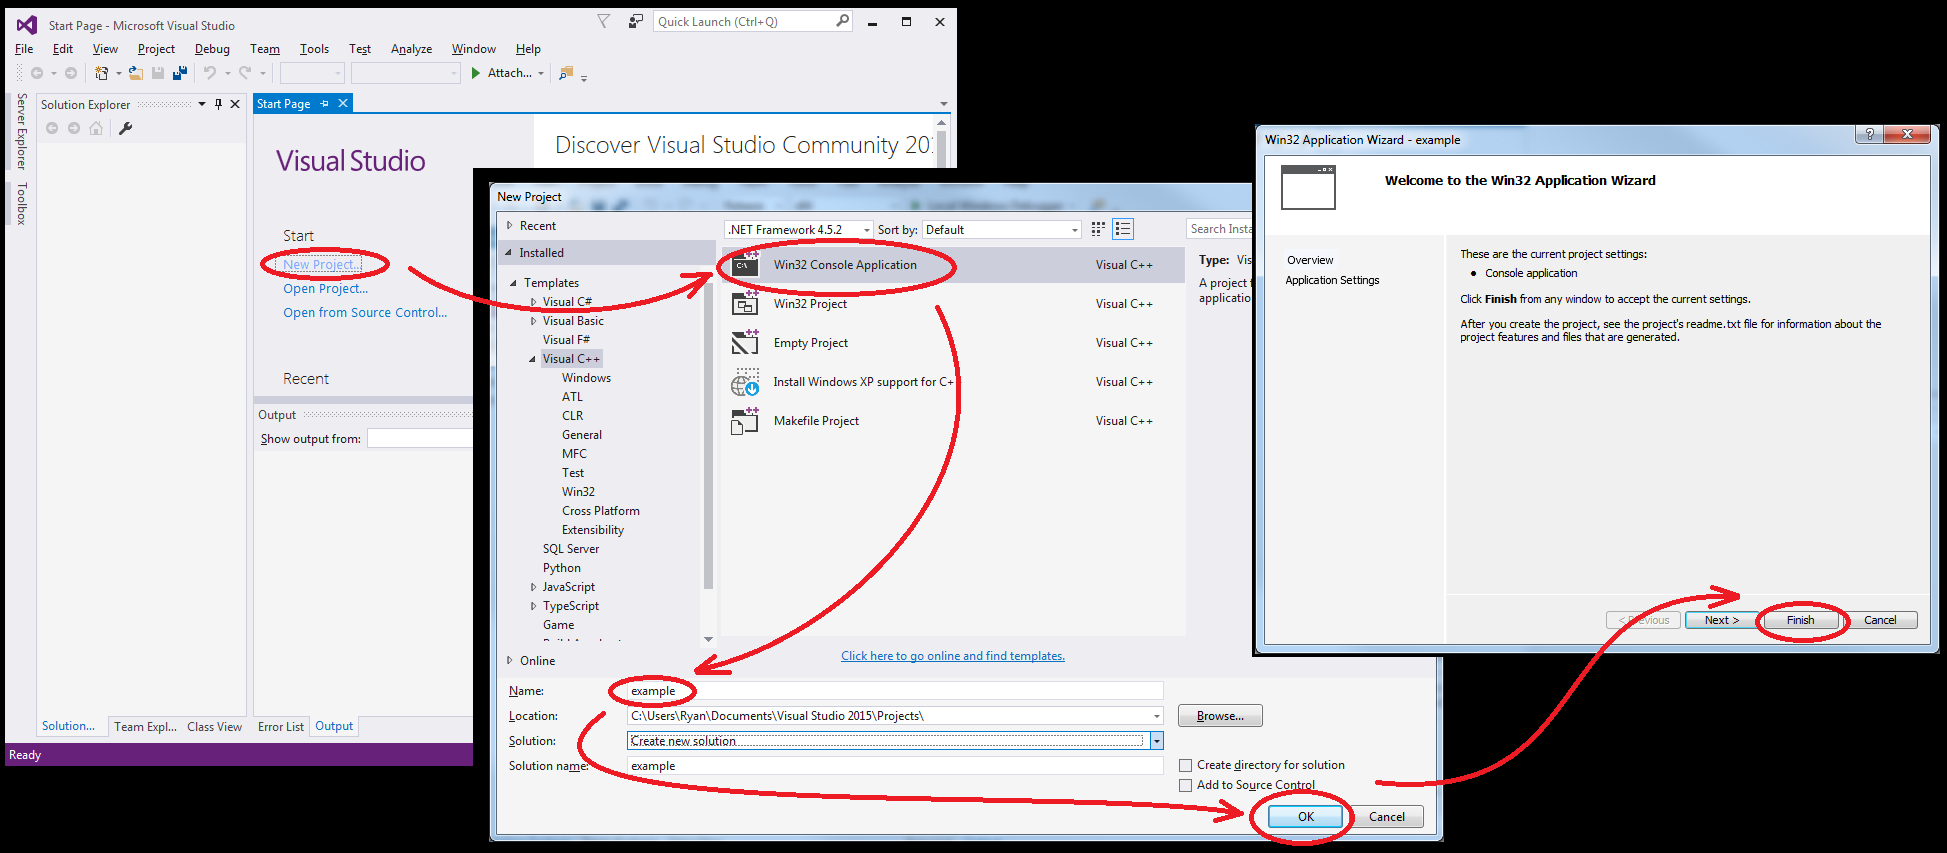
Click here to view fullsize image.
Copy the source code from below and paste it into example.cpp within Visual Studio:
Before example.cpp can be compiled, several build properties need to be changed (see screenshots if needed):
- Change the configuration from Debug to Release (screenshot)
-
Adjust the bitness of this project to match the bitness of
myramath.lib(screenshot) - Turn off precompiled headers (screenshot)
-
Add the source directory,
"My Documents\MyraMath\source", to the list of Additional Include Directories (screenshot) -
Define the symbol
MYRAMATH_ENABLE_CPP11for the C++ preprocessor (screenshot) -
Add
myramath.libto the list of Additional Dependencies (screenshot) -
Add the install directory,
"My Documents\MyraMath\install"to the list of Additional Library Directories (screenshot)
Build example.cpp, it should produce "x64\Release\example.exe". You can run it from the terminal, but make sure that myramath.dll and myrakl.dll are in your %PATH% (they are in the install folders of their respective projects). This program makes a small matrix A, computes its explicit inverse Z=inverse(A), then multiplies them together (to form the identity). The expected output is something like:
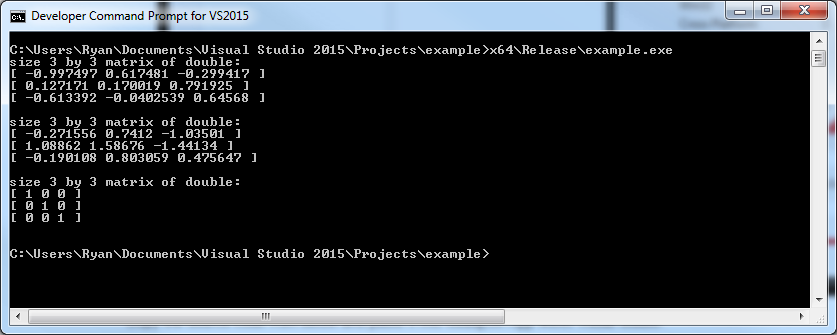
Click here to view fullsize image.
At this point, you've covered all the build steps required to integrate MyraMath into new or existing projects. Now would be a good time to take a guided tour through the API Tutorials. The tutorial programs are gathered within myramath_tutorial.exe and can be run just like the unit tests. Alternatively, you can copy/paste the source code from any of the tutorial .cpp files into this new project and test things out for yourself, just make sure to remove the ADD_TEST(...) macro and replace it with int main().
Go back to Building and Dependencies